In a previous article, we provided a high-level overview of how Vultisig operates as a multisignature-like wallet. It is essential for vault owners to manage their vault shares properly and securely to ensure full control of their vaults at all times.
The immediate question on your mind might be: “How would I know if I have managed my vault shares properly, and how can I check?”
First, you need to be very clear about what type of vault works perfectly for you so that you feel comfortable storing your precious crypto funds using Vultisig.
In this article, we focus on the Secure Vault and discuss in detail what needs to be done and what to be aware of for proper vault shares management.
TLDR : Please always make sure vault details and public keys are verified across all devices/ vault shares. Before sending large funds into a new vault, please test the new vault by sending small funds in and out first. Follow the same standard practices as when setting up a new wallet.
To create a Secure Vault, you need a minimum of three devices to simultaneously create a 2-of-3 vault. To execute a transaction or transfer funds, you need any 2 of these 3 devices to co-sign simultaneously to authorize the transaction or funds transfer.
Without access to and in control of at least 2 compatible vault shares, you would not be able to do anything with the funds stored in the vault. In other words, if you only have access to 1 vault share, you will not be able to access your funds. Similarly, if a scammer obtained one of your 1 vault share, your funds are still safe and cannot be stolen by the scammer.
Hence, as a Vultisig vault owner, it is very important to ensure you always have access to and control of at least 2 out of the 3 vault shares.
Let’s say you have a Windows laptop, a phone, and a tablet.
You initiate the vault creation on the Windows device by clicking “Add New Vault → Start” and follow the instructions, use the phone and tablet to pair by clicking “Add New Vault → Pair” to scan the QR code displayed on the Windows device to start the new vault key generation.
Once the key generation is completed, you will have the following vault shares:
- Windows: Vault Share called Part 1 of 3
- Phone: Vault Share called Part 2 of 3
- Tablet: Vault Share called Part 3 of 3
“How would I know if I have managed my vault shares properly, and how can I check?”
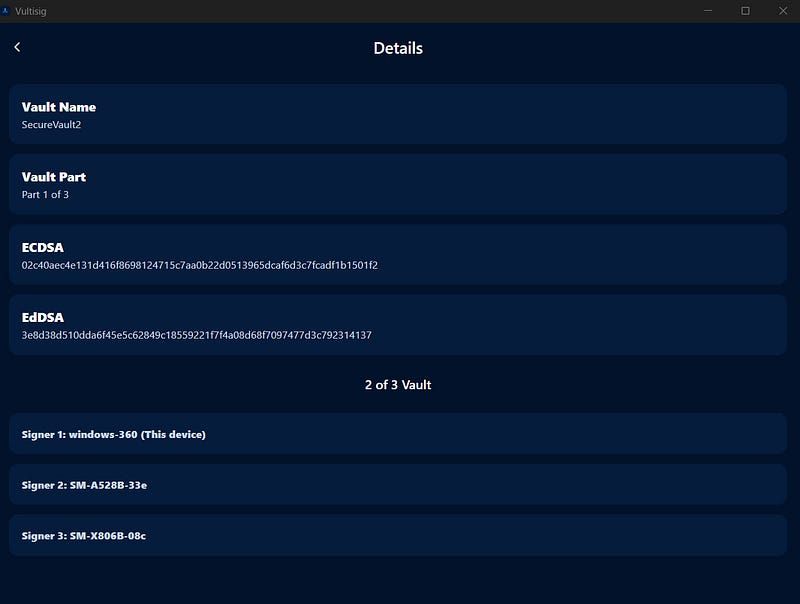
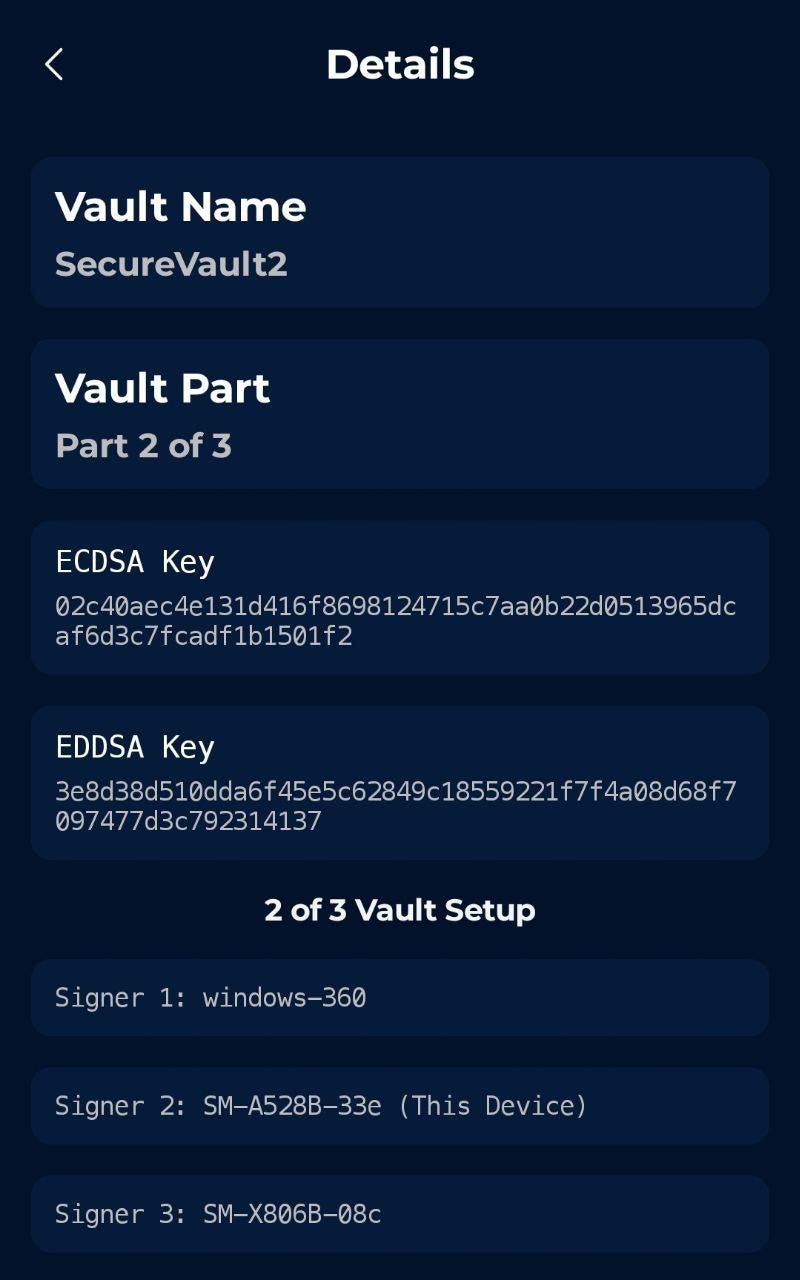
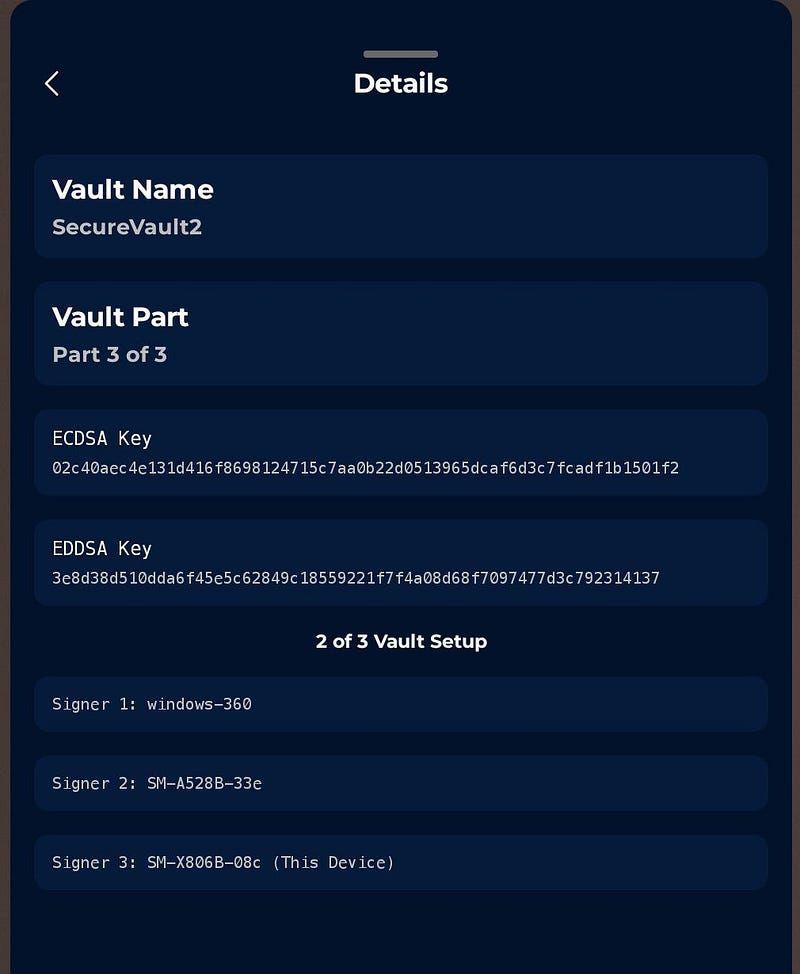
Access the newly created Vultisig vaults on all your 3 devices (Windows, phone, and tablet). Go to “Vault Settings → Details”. You will see the vault details on all 3 devices. <Refer to Photo 1, 2 & 3 below.>
Check the Vault Details pages: Ensure all 3 devices have distinct vault share parts and signer numbering, clearly differentiating them as 3 unique vault shares.
- Windows Vault Share is named Part 1 of 3, being Signer 1.
- Phone Vault Share is named Part 2 of 3, being Signer 2.
- Tablet Vault Share is named Part 3 of 3, being Signer 3.
2. Verify the public keys: On the Vault Details pages, check the public keys (ECDSA and EDDSA) on each vault share to ensure they are the same across all 3 vault shares.
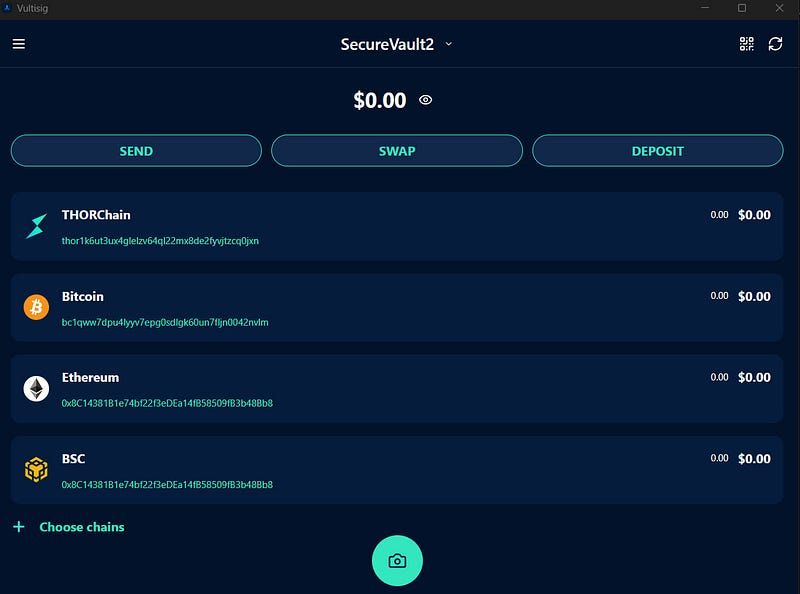
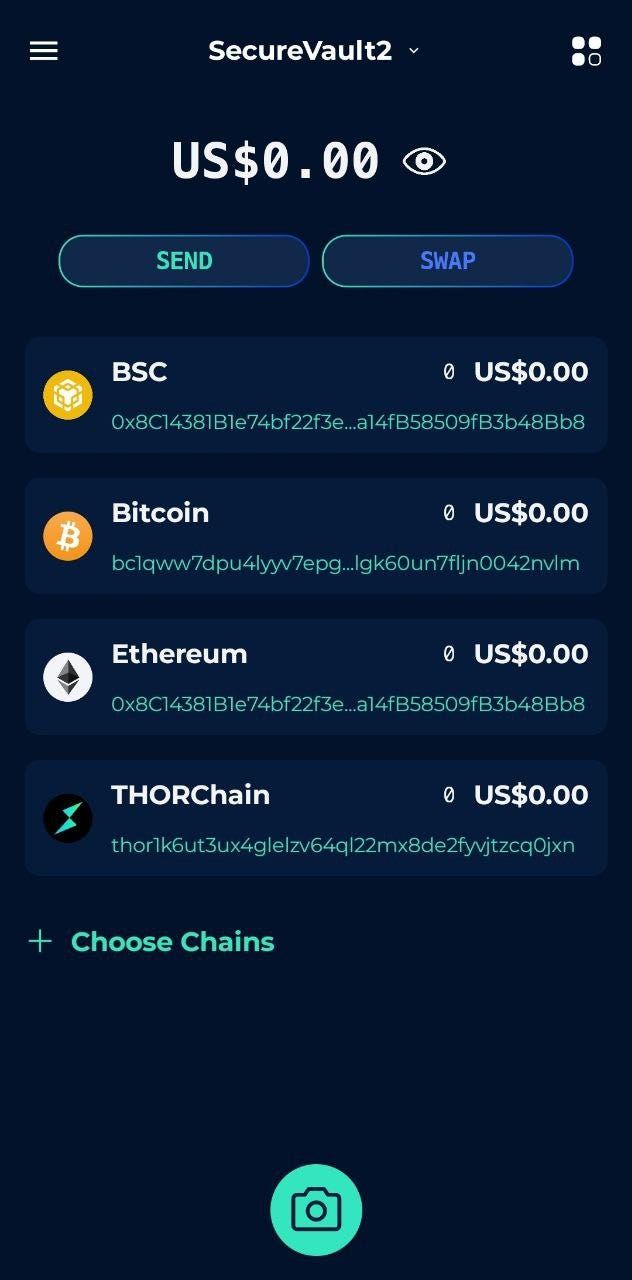
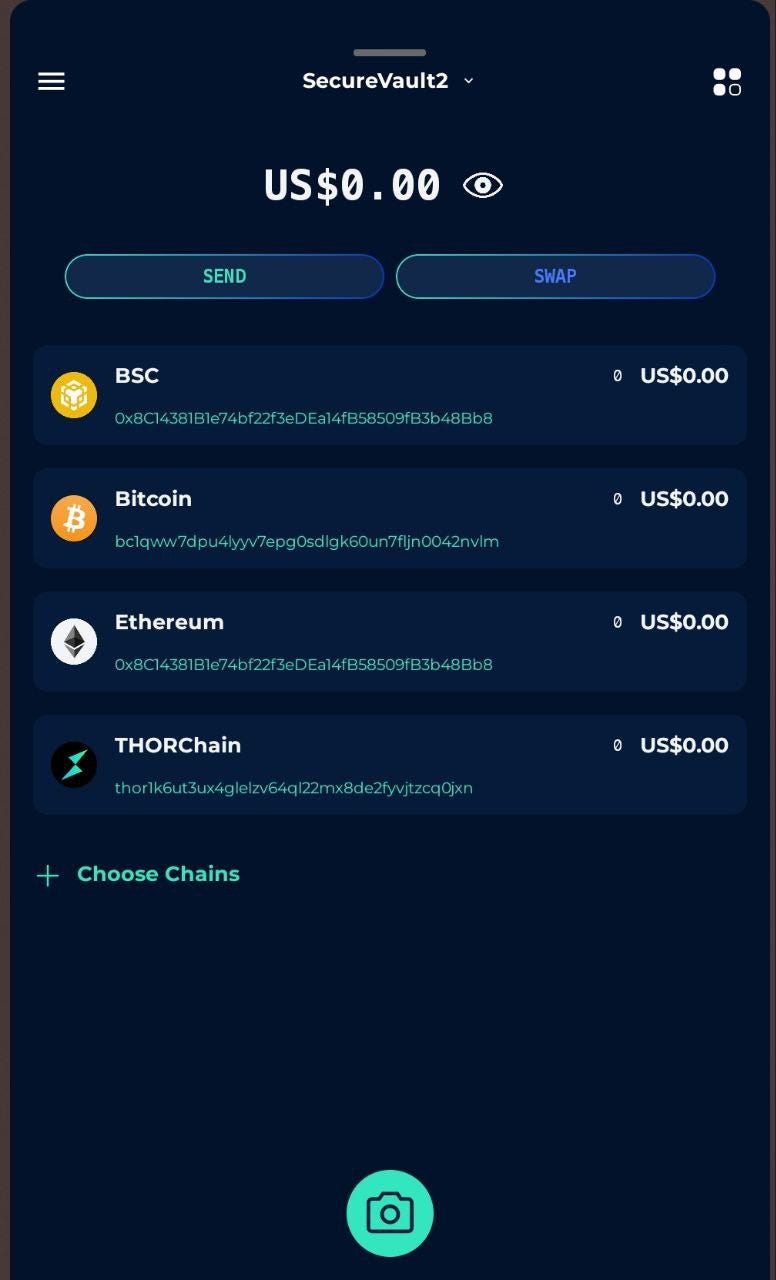
3. Cross-check wallet addresses: On the main vault page, perform a cross-check of the wallet addresses to ensure they are identical across all 3 devices. Since Vultisig is a multichain vault, you may select major blockchains (e.g., Bitcoin, Ethereum, THORChain, BSC and Solana) to do this final cross-check. <Refer to Photos 4, 5 & 6.>
After completing these checks, it is recommended to perform the following steps:
Back up all 3 unique vault shares and store each share in a different location, away/separate from your devices.
Permanently delete the vault shares from all 3 devices.
Import each individual vault share onto its respective device.
Cross-check the details of all vault shares and wallet addresses again.
Perform small fund transfers in and out.
If everything is in order and the test fund transfers are successful, this indicates that the newly created vault is secure and ready for use.
We recommend verifying the location and accessibility of the backed up vault shares from time to time.
Following these procedures you are storing your assets secure and always accessible in your Vultisig Vault.
<Photo 1>
<Photo 2>
<Photo 3>
<Photo 4>
<Photo 5>
<Photo 6>
===
Please feel welcome to join the THORChain University Discord to chat about this topic or any other THORChain interest you may have.
*New!* The Bifröst School: A robust, incentivized,freeon-chain learning program that teaches THORChain users everything about its mechanics, design, and features.
Explore THORChain: Website, X, Telegram, Developer Discord.
Explore Maya Protocol, the first friendly fork of THORChain: Website, X, Discord, Telegram.
Decentralized, permissionless, non-custodial, trust-minimized, open-sourced, economically-secured, non-wrapped, native-to-native cross-chain swaps, and savings!

Related articles
![THORChain May 15, 2026 Exploit Report #1]()
May. 20, 2026
THORChain Exploit Report #1
![]()
May. 14, 2026
Explanation of the 6 Preset Strategies to Help Create Your CCL Strategy
![]()
May. 13, 2026
The Casino Problem: When Crypto Forgets What It Was Built For
![]()
May. 12, 2026
THORChain Protocol Upgrade v3.18
![]()
May. 11, 2026
Dash is coming to THORChain
![]()
May. 8, 2026
Monero Merged, Reserve Burn, Marketing Update | Podcast #196
![]()
May. 7, 2026
Marketing Update: Feb - March 2026
![]()
May. 5, 2026
RUJI Staking Rewards Are Live, Earn Real Protocol Revenue on Rujira
![]()
May. 4, 2026
Bior Labs Cards Are Imminent: Bill Pay, $10K Virtual Cards and a Stablecoin Alpha
![]()
May. 2, 2026
Live from Bitcoin Vegas: 2 bps Stable Swaps, v3.18 Next Week and the Affiliate Revshare Plan
![]()
Apr. 30, 2026
THORChain Quarterly report - Q1 2026
![]()
Apr. 29, 2026
bRUNE Staking Cap Increased to 2 Million, How to Stake, and Earn THORChain Yield
![]()
Apr. 28, 2026
Protocol Upgrade - v3.17.0
![]()
Apr. 27, 2026
Unstoppable: The Best Privacy Wallet – THORChain Mobile Interface
![]()
Apr. 24, 2026
THORChain Stands for a Permissionless and Decentralized Ethos